


Today, we’re continuing the series, “Google Hacks” for teachers. Today’s focus: Breakout Rooms. Since March, teachers have been working to meet with students using video conferencing software such as Zoom, Microsoft Teams, and Google Meet to communicate with students. For the most part, these tools are doing a pretty good job allowing teachers to deliver instruction to their students in a whole group setting. But… what about small groups? How can teachers recreate meaningful personalized instruction that comes with small groups group instruction and bring it online? Enter… Breakout rooms in Google Meet!
Using Breakout Rooms in Google Meet
So what are Breakout Rooms? Simply put, Breakout rooms are the ability to section your students into smaller groups within your video-conferencing software. Basically small groups in digital form!
But… how can you do it?
Today, I’m going to share how to use a Google Chrome Extension with Google Meet to break your students into smaller groups so you can start delivery small group instruction again in your distance learning classroom. YEAH!
Getting Started with Breakout Rooms in Google Meet
To get started, you’re going to need to get the extension! There are several but the best I found is called “Google Meet Breakout Rooms”. It’s FREE, and here’s how you get it:
- You can do a quick Google search for “chrome extensions” or just click on this link: https://chrome.google.com/webstore/category/extensions
- Be logged into your Google account. In the search bar, type “Google Meet Breakout Rooms” → press Enter
- Find the Purple “b” icon for the breakoutroom extension, then click “add to chrome”.

Now you’ve got the extension! YEAH!
How to Use the Breakout Room!
Ok… you’ve got the extenstion, now let’s talk about actually using it!
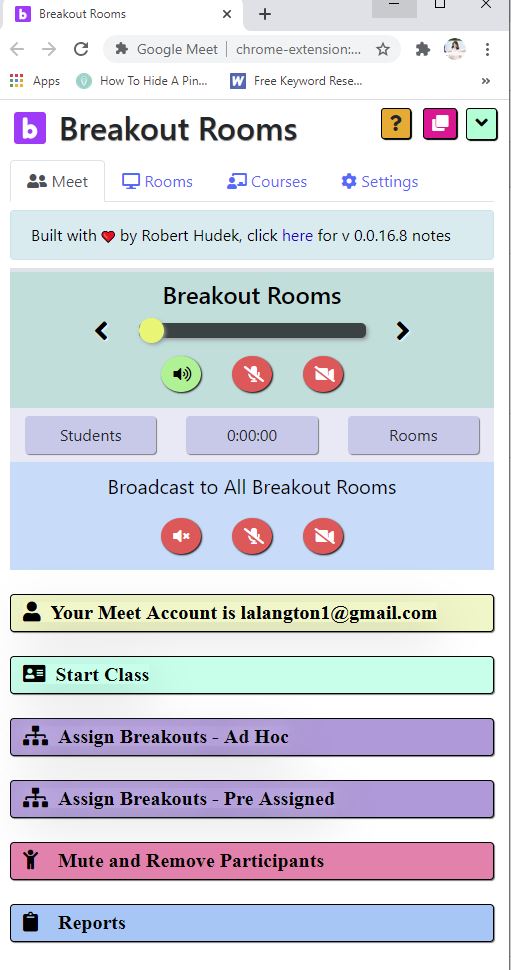
- Make sure you’ve got it! Look for a purple “b” image at the top-right of your Chrome browser. If you don’t see it, click the dark gray puzzle piece and select “Google Meet Breakout Rooms” to open the Extension program. In the new window, you’ll be able to create, monitor, and navigate through each of the breakout rooms.
- The designer has a website that offers instructions and tutorials: https://www.hudektech.com/projects/breakout/

So how does this work? Unlike other video conferencing software, Google Meet already allows you to open and run multiple meeting rooms at the same time (each with their own unique link).
The “Breakout Rooms” extension helps you create/organize a virtual “main room” along with multiple “breakout rooms”. It then connects these rooms so you can toggle through them one at a time.
As you move from room to room, it automatically turns off your microphone, speakers, and camera to all rooms except the one you are in (you can still see the other rooms, they just can’t see/hear you). However, if you need, you can manually turn these features on to broadcast to all rooms at the same time.
There is one “catch” with this program… you can’t automatically move students from your main room to their assigned breakout rooms. Wump-wump!
Students move to breakout rooms by clicking on the links you provide them. So… a little inconvenient, but not a deal-breaker by any stretch!
Easy Way to Create Breakout Rooms
Creating the breakout rooms is pretty simple. Once you’ve opened your Google Meet, click on the Breakout Rooms extension icon on the top of your screen.
From there, toggle over to the “Rooms” tab. You’ll see a main room is already made with a link.
To add more rooms, click the green “+”. Name your room. Here, I named my rooms similar to my reading groups.
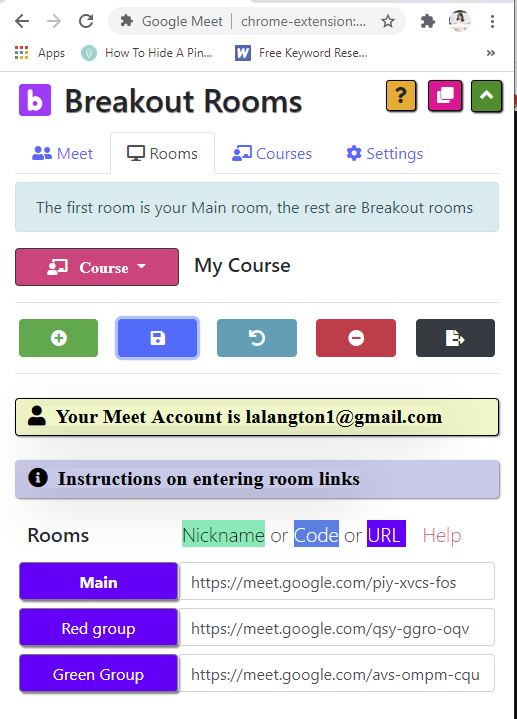
Create as many groups as needed for your assignments. Next, you’ll need to add your students to their breakout room!
Assigning Students to Breakout Rooms
There are two ways to assign students to breakout rooms. First, you can manually assign students while in the Google Meet. This is great if you’re wanting students to work on collaborative projects and prefer them to pick their topic and/or group.
The other way is to pre-assign students before the actual meeting. This would work great if you are planning more of a “small group” rotation style activity like small group instruction for reading or math.
How to Auto/Manually Assign Students on the Fly
- When you start your class, it asked you to select the number of breakout rooms. AFTER ALL students have joined the Main Google Meet Room, in the extension window, click “Assign Breakout Rooms Ad Hoc” to view the list of students and breakout rooms.
- Either click the “Randomly Assign” button or manually drag students to each room. Once assigned, there is a statement just above that says, “Please click once you have the group assignments the way you want them”. Clicking the button will open options to copy the links to each breakout room as well as copy the list of students’ room assignments.
- Copy the links.
- Paste each link into the meeting chat for students to view their room assignment and click on the appropriate link.
How to Pre-assign Students to Different Groups
- Before meeting with the students, in the extension window, click the “Start class” button to select your course and number of breakout rooms.
- Under “Assign Breakouts-Pre-assign”, click the button to copy the list of breakout room links.
- In a separate document paste those links and enter your student names (from your roster) under their assigned group.
- Share the document with students prior to the Google Meet or copy/paste assignments into the chat during the meeting.
Sharing Assignments During your Breakout Meeting
In order to use the “Attachments” feature in any Google Meet, the meet link has to have originated from a Google Calendar entry.
So annoying!!!
Instead, have your links to your assignments (docs, slides, videos, etc.) ready to paste as ‘share links’ through the Chat in each meeting room. This way you can share what students need and NOT add a bunch of extra stuff to your calendar!
How Else Can Your Use Breakout Rooms?
Aside from utilizing Breakout Rooms to create an online “center rotations”, here’s a few other ideas on how to use this pretty neat extension!
- Project collaboration – students are in there to work together on a single project
- Added Support During a Whole Group Lesson-Utilize a breakout room for students to come and go to ask questions or seek support away from the whole group.
- Assessment Monitoring- Use it as a monitoring system for assessments – place students in individual rooms. (I suggest staggering your students! That’s a lot of Breakout Rooms you’d need to create!) They can share their screens for teachers to monitor as they complete their work.
As of now, there have been some rumblings that Google plans to add a “Breakout” feature to Google Meet. But, no one really knows when this roll out will happen (Or if you’re school will also have access to it!) So, this little workaround is perfect until then!
The FREE “Google Meet Breakout Rooms” extension is a great resource for teachers to implement small group math or reading instruction. It’s also a great resource for bringing collaborative activities to your distance learning classroom.
Related Content
Looking for more Google Teacher Tips or Small Group ideas? Check out these related posts!
- How to Organize Your Google Classroom for 2nd Grade
- How to Use a PDF in Google Slides
- The Simple Way to Teach Reading Comprehension (and science!) in your Digital Classroom
- Organizing Your Small Group Instruction
Have you used Breakout Rooms in Google Meet? Tell us how it went by commenting below!